Watch Grogni play some Cyberpunk 2077 live!
Be sure to follow and say hello in the chat to help him on his way to twitch affiliate.
Getting in the streamin’ spirit!
Watch Grogni be Sus! Streaming Among Us Now!
Be sure to follow and say hello in the chat to help him on his way to twitch affiliate.
Cookin’ up a stream
Grogni is thankful for YOU to follow him as he streams live on twitch!
Be sure to follow and say hello in the chat to help him on his way to twitch affiliate.
Grogni is online!
Hey all! Grogni the dwarf is streaming live on twitch!
Be sure to follow and un-mute to help him on his way to twitch affiliate.
https://www.twitch.tv/grognithedwarf
Pixel Pitch
Well! That was an adventure. Ok so yes, things got quiet here. We still plan to finish the related blog series but for now, I just wanted to announce we have released our first game Pixel Pitch ™. Pixel Pitch is an arcade ‘brick-breaker’ casual mobile game. It is now available on the Apple app store in the U.S.
We would like to release our games to other countries but this is another first among many firsts for our little game company. So we will want to ease into this journey. More to come.
Pixel Pitch Dev Blog Series – The UI (Part 2)
Hello once again! Jason here with part two of the UI piece of our Pixel Pitch Dev Blog. This is the second post of the series and will again address the User Interface.
To recap, we left off after having mapped the UI and come up with the code to activate and disable menu panels of buttons as necessary. Now at this point, we had basic white squares for buttons and white squares for the background of those menus. These panels as you might have guessed were pretty hard to see because – well you couldn’t see white on white. Unity does have an asset store with which we could purchase or sometimes download assets for free. However, we wanted to stick with assets that we created.
I talked to one of our artists, Melanie, to create some concept ideas for our own buttons and panels. While we knew that the first version of this visual theme for the UI was not going to be what we wanted, we needed something to start with and to allow us to use the design. Full disclosure, I am not an artist and since I just needed buttons ( and did not put in the time to research a visual theme ) the requests I made were not the best design. The effort, however, and Melanie’s willingness to just come up with something as it was requested, was greatly appreciated. So here is what we had initially and then what I requested as the first version of the UI –
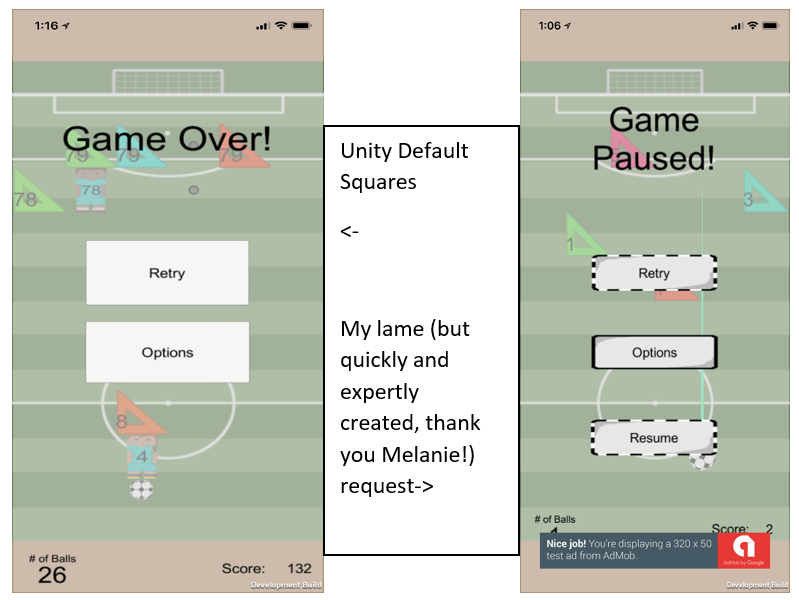
You might notice that there is a semi-transparent background for both of these; which is what we decided to do as a solid background didn’t look good.
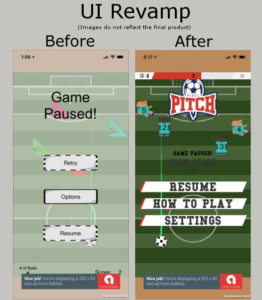
With a basic UI design in place, we moved on to finish art and sound asset requests for the gameplay as well as tackle some light coding to get our game features working as desired. Part 3 of the UI blogs will cover where we decided to display information on the screen and a lesson learned on pushing development builds out that the entire team can access.
Pixel Pitch Dev Blog Series – The UI
Salutations
Hello folks. My name is Jason LeBoeuf or ‘Sazed’ if we get around to making multiplayer games. I am a founder of Fancy Robot Games and the Lead Developer on our very first game, Pixel Pitch. This is the first in a series of posts about our development of the game. We thought this would be interesting for some as a pseudo-documentary of the challenges we faced developing our first video game.
So, let’s dig in, shall we?
ALWAYS dump the entire box of Legos on the floor to start
First off, a disclaimer – Pixel Pitch will be our first ever game to build and push out to the public for sale. We know we aren’t at the level of companies like Double Damage, Arrowhead, Psyonix, Gearbox or (definitely not) Blizzard. They served to inspire us, however! All that we ask is that if you have feedback to give, make it constructive. Be mindful that this blog entry is descriptive but is not intended to be a tutorial for making games. There are plenty of tutorials out there and I felt we should limit our blog posts to be informative as far as to what we encountered while developing this game.
When it came to the User Interface the first thing we did was, in the game engine Unity, design a very basic concept that was simply a vertical series of three or four buttons that were horizontally centered on a UI canvas (Unity design speak for a, usually 2D, panel that is rendered separately from the gameplay area). This was to serve as our main menu. There were no custom graphics, there were only unity stock assets. Without going too far into other topics, Pixel Pitch was designed with two scenes that could be navigated using a button menu system. The primary reason for two scenes was, at the time, we were unsure how this game would contribute to income for us. If we wanted to add advertisements we would structure the game to allow us to trigger advertisements between menus, allow consumable unlock pop-ups between scenes or whatever we could think of. We were thinking, “let’s try for flexibility without over complicating things”. So, two scenes felt like the right way to go.
Start mapping out the UI structure
The second scene of Pixel Pitch had a similarly simple menu setup, a string of buttons down the center of the screen that would pop up when the game was paused.
Before I delve too much further, I want to encourage anyone who has ever thought about getting into making games to do just that. Go download a free game engine like Unity or Unreal and just start getting your hands dirty. There are SO many video tutorials on the internet with SO much information just out there for free. A bit of a warning, I may get into some Unity-specific design descriptions and potentially code speak. Ye who would enter here be warned.
The next task was to decide, for each scene, what those buttons/panels would do and map out the menu structure. We knew on the first scene we needed a start button to start the game. So, we documented that (this little bit here about documentation is kind of a hint on a future dev blog entry). Next, we wanted a High score panel to show the highest score achieved from gameplay. We thought, okay so let’s just grab a whiteboard and list this all out. After much discussion, the first scene was going to look like (apologies on the whiteboard picture, we didn’t take one of the full written out UI list) –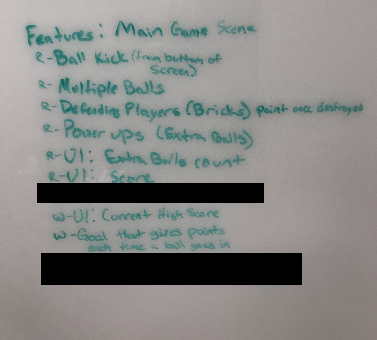
- High Score readout
- Last Score readout
- Start Button
- Launches second scene
- How to play
- enables the tutorial panel, closes the main menu panel
- has a close button that closes tutorial panel, opens main menu panel
- Settings
- Enables settings panel, closes main menu panel
- Music volume slider to save music volume level
- Effects volume slider to save effects volume level
- Credits button to close settings panel, open credits slideshow
- Close button to close settings panel and open main menu panel
The second scene started like this –
- Gameplay UI
- Ball count
- Current score
- Power bar(s)
- Pause button
- Pause Button from gameplay UI elements activates the pause panel which has –
- High Score readout
- Current score readout
- How to play
- enables the tutorial panel, closes the pause menu panel
- has a close button that closes the tutorial panel, opens the pause menu panel
- settings
- Enables settings panel, closes the pause menu panel
- Music volume slider to save music volume level
- Effects volume slider to save effects volume level
- Credits button to close settings panel, open credits slideshow
- Close button to close settings panel and open pause menu panel
Ok, so we have a map and we now know where the buttons should lead. Let’s get some code done to make it happen!
Rise up Nerds
What we need is a sheet of C# code to serve as a repository of functions to make the game close and open menu panels depending on the button that is pressed. In Unity, each button has a special component that allows it to refer to this sheet of code (or script). Then you tell the button which functions from that sheet of code to use. For example, if I want my start button from the first scene to launch the game (the second scene), I tell the start button to use the “MainMenuManager” script and from there I can tap into the script and tell it to use the StartGame function.
We will use the StartGame function as our simple example of how all the other buttons work. In the MainMenuManager script of Pixel Pitch there is a function that looks like this –
public void StartGame(){
SceneManager.LoadScene(“SecondScene”);
}
The Unity engine user interface is able to utilize this outside of the code because StartGame is a public function. Most objects declared as public can be used/serialized for use with Unity in this way.
This boils down to buttons that can be assigned scripts through the Unity interface is easy to implement. Which is fantastic for simple UI testing after mapping everything out!
Now keep in mind we had to build out UI panels for settings, tutorial, and credits. These were all built in a similar fashion to the main menus on the first and second scenes as described above. Just instead of only buttons, I would choose image, or slider as appropriate within unity. Each button would have a function named appropriately for what it needed to do. Then each function was assigned to the buttons as described above.
So we have a map of the UI, and we’ve done the simple coding to activate menu panels of other buttons or sliders or close them down as necessary. Time to talk to the artists so we can get an idea of what we want the visual design to be. I hope these blog posts will be helpful in inspiring those of you that have been wanting to get into game design or helping gamers understand the planning required and hurdles encountered when designing.
Keep an eye out for our next Dev Blog soon!
– Sazed
Here we are!
Hello there and welcome to Fancy Robot Games. I’m so glad you found your way to our little slice of the internet. We have two projects currently in development. Our first project is about to hit the beta stage so please watch this space if you are interested in helping us test our game. While you wait, feel free to head over to our Facebook page or Twitter to leave us a post or tweet. We look forward to chatting with you very soon.